Be Careful What You Buy
I Want to Have My Cake & Eat it Too!
By Curt Taipale
It happened to me again last week. I was at a church trying to voice their ailing loudspeaker system in an effort to make it sound at least as good as it could. We’re in the process of designing a replacement system for them, but I don’t like to walk out and let any system sound as bad as that one did.
I tried my best. I used every trick that I know, and several thousands of dollars’ worth of test gear to help me sort it out, and still left unrequited. That virtually never happens to me, so I was frustrated.
Ultimately, what stood between me and a decent sounding loudspeaker system was a cheap, ‘er, inexpensive one-third octave equalizer. In order to make even a small change in the frequency response of the system I had to pull the EQ control down to something like -12! In other words, adjusting the EQ slider to -12 dB at, e.g., 1 kHz, resulted in about a 3 dB change in the output.
Now, I’ve been doing this long enough to realize that there are anomalies that can show up in the frequency response of a loudspeaker system that are basically time-related, not frequency-related.
Ultimately what that means is that you can’t fix it with an equalizer – it has to be resolved by some other approach or tactic. But I ruled that out in this particular case. This was just a poorly designed equalizer that didn’t do what it promised by the silkscreen.
As I mentioned, this isn’t the only time that this has happened to me. I was on a similar trip to another church last year. Our contact at the church told us about how one of the members of his tech team had spent hours making small adjustments to the system equalizer just using his ears. They had achieved a setting on the one-third octave equalizer that they were happy with.
But when I listened to it, I decided that we could at least get it to sound better than that. So I grabbed my test gear and set out to improve on things. And I found myself following a similar track where it didn’t seem to matter what I did to the EQ unit – it just didn’t show up as a corresponding move on the TEF analyzer display.
I was intrigued enough to stop for a moment and try connecting the equalizer unit directly to the TEF. In other words, I would make a purely electronic measurement to evaluate the response of the equalizer at various frequencies.
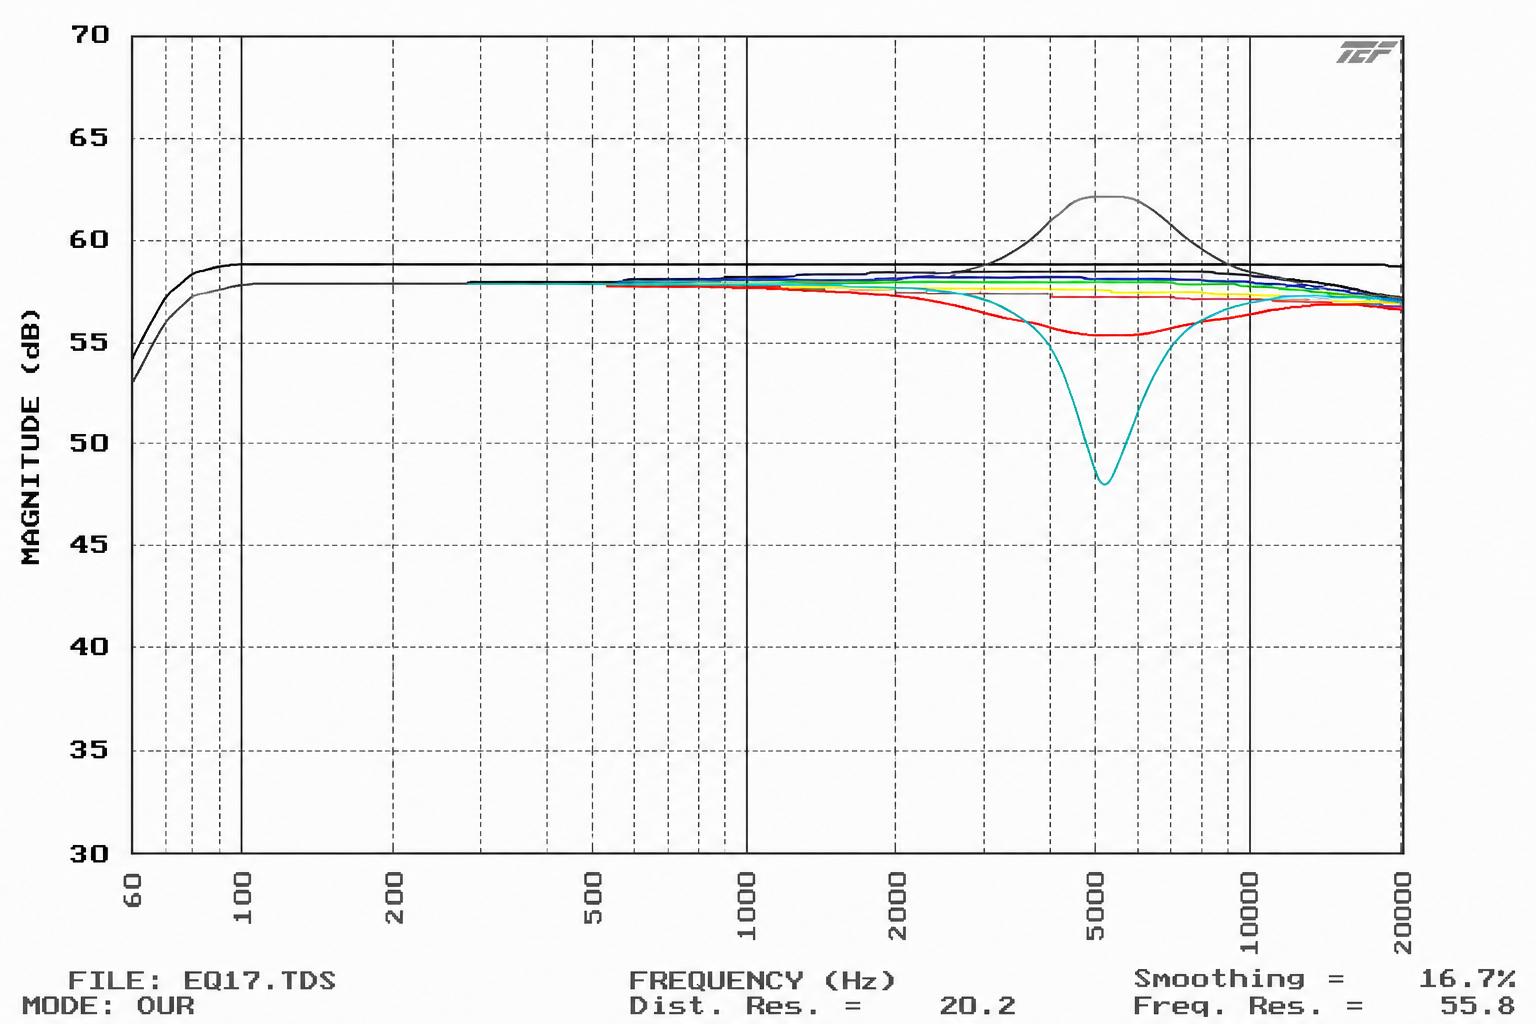
My suspicions paid off. Want to see the results? I made individual sweeps at a variety of frequencies and then overlaid those curves on one graph. Indeed, one had to push or pull those graphic sliders substantially before the curve would even begin to move in response.
I’m used to working with very good equalizers. When you tweak a good EQ and measure its response, you’ll find very close agreement between what the EQ unit is saying it’s doing and what you measure in response.
Frequency Response of an Inexpensive 1/3 Octave Equalizer
These measurements were made with the 1/3 octave equalizer connected directly to an electro-acoustic analyzer called the TEF Analyzer. The test signal is fed to the equalizer’s input, and the output of the equalizer is connected to the line level input of the TEF.
One would expect that adjusting the controls based on the markings on the front of the unit would yield close to that effect in the acoustic output of the loudspeaker.
In other words, if we pull a graphic slider down -4 dB at 500 Hz, we expect to see a corresponding drop of 4 dB at 500 Hz in the measured output of the loudspeaker.
However, as we can see here, the unit does not live up to its silkscreen even when connected directly to the analyzer.
The black, relatively flat line is the response of the unit with all controls set for flat, in effect with the unit bypassed. the overall level drops by about 1 dB when the unit is put into circuit.
The EQ settings we adjusted here were all made with the 5 kHz slider. A separate TEF sweep was made with -3 dB, -6 dB, -9dB, -12 dB, as well as at +3 dB, +6 dB, +9 dB and +12 dB.
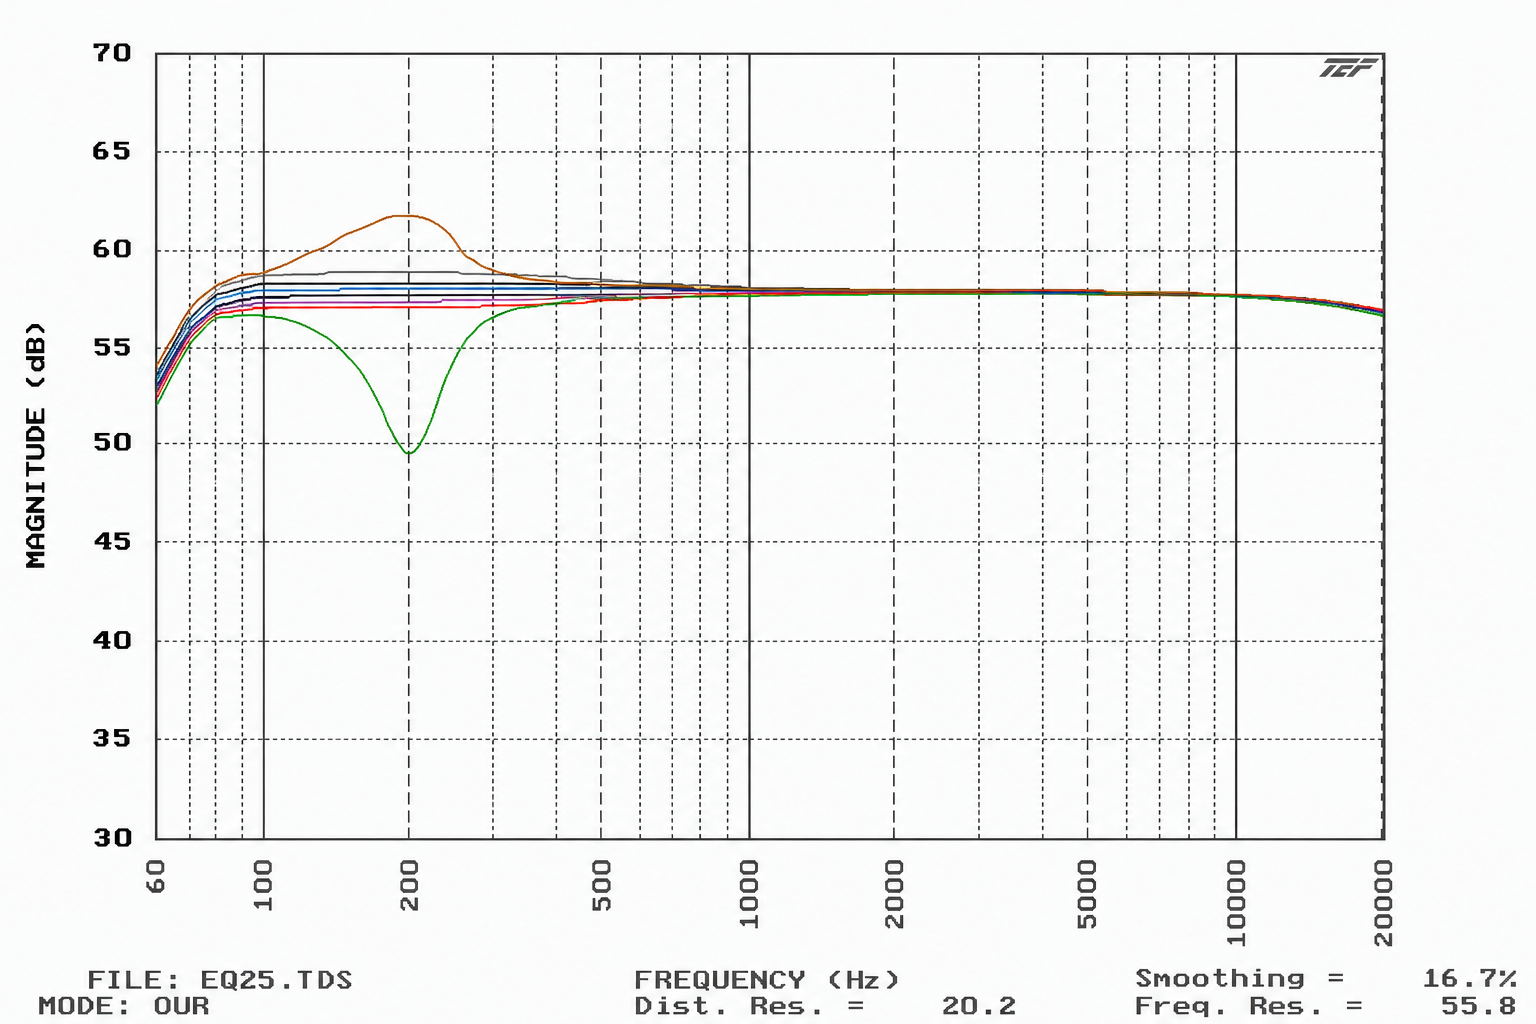
Even a casual scan of this graph shows that the equalizer doesn’t even begin to achieve those results. To ensure that we didn’t just have a problem with one frequency slider, we took similar measurements at other frequencies, and even with a second unit of the same model. Similar results were found in all tests that we did.
Frequency Response of an Inexpensive 1/3 Octave Equalizer
These measurements were made under the same conditions as those in the last graph, this time with a center frequency of 200 Hz. Similar results were achieved. Note that the equalizer makes little impact on the signal itself until the slider is pushed beyond the +/- 9 dB position.
Basically, one has to push the slider all the way up, or all the way down in its travel, in order to affect an aural change to the signal.
Cherry Frosting
I realize that it’s tempting to believe the promise of the cut sheets, but you really need to keep your wits about you when you go to buy the next widget for your church’s sound, video or lighting system. The old adage that “you get what you pay for” is still true.
Despite our best efforts to be good stewards of the money we’ve been given to spend, sometimes the best thing to do is hold onto that money and wait until we have enough to buy the better unit.
One way to keep from wasting those dollars is to do your homework. That means perusing the internet or polling our Church Sound Class for user reports on the unit you’re wanting to buy.
It may even mean asking the store to let you try the unit for a weekend with no obligation simply to confirm that the thing actually does what you want it to do. This is especially true of wireless microphone systems.