
The Secret to Great Mic Placement?
The Secret to Great Mic Placement? Trust Your Ears.
Piano, guitar, drums, brass, and the lessons that make mic technique work.
By Curt Taipale
Like every beginning student of audio, I fully expected my instructors and mentors to be able to share with me the secrets of great microphone placement technique. I sat anxiously in one of my first audio classes only to be disappointed by hearing the instructor say that he really couldn’t tell us exactly how to mic an instrument because, well, it just isn’t that simple.
After decades of making my living in this business, I can comfortably say that my instructors were absolutely right. The only formula to understanding mic technique is to have a working knowledge of (1) how microphones are built and why, (2) how each instrument creates sound, (3) how that sound develops in the acoustic environment in which it is placed, and then (4) where to place the mic in that environment to capture the sound you need for a particular musical setting.
Okay, so what do you do with all that?
Put the mic where it sounds good.
Only you can determine what sound is appropriate for your application, so you’re going to have to trust your ears. If you’re trying to capture a natural sound, you’ll probably have more success miking the instrument or voice at a distance. Just think about where the listener typically sits. If you want to create a clean, individual, in-your-face kind of sound, then use a close-miking technique. Inches instead of feet.
The joke is that if you ask ten sound engineers how to place a microphone on a piano, you’ll get at least 47 different opinions on the right way. No one can give you hard and fast rules for mic technique that ensures the perfect sound for every possible musical setting, but I can at least share with you some of the choices that have worked for me in various applications.
Standing on the Shoulders of Giants
One of the blessings of spending a lifetime in audio is getting to learn from those who came before us. We stand on the shoulders of giants. Engineers like Bill Porter and Al Schmitt and so many others helped shape the way we capture music, and they generously shared what they learned along the way.
One lesson worth passing along is that they invested their time in choosing and placing microphones to capture the sound they wanted before they reached for the EQ. They listened. They moved the mic. They listened again. And sometimes a small change in placement made an enormous difference.
Now, don’t misunderstand me. I love having a good EQ at my fingertips. There are plenty of times when it is exactly the right tool. But if you can get closer to the sound you want by moving a mic a few inches, why not start there? You’re shaping the sound at the source instead of trying to repair it later.
Think about an acoustic guitar. If the mic is aimed right at the sound hole, it may pick up a muddy, boomy sound. You could work on that with EQ, but you may discover that moving the mic up toward the fretboard gives you a more natural sound in the first place. You haven’t touched the console. You’ve simply listened and moved the microphone.
So here’s something I’d encourage you to try during rehearsal, when you have a little time and aren’t trying to keep up with a worship service. Put on a good pair of headphones, listen to the mic in isolation, and have someone move it around while the musician plays. Listen to what happens when it’s moved just a few inches. You might be surprised.
That’s one of the gifts those giants left us: not a magic formula for mic placement, but a habit of listening carefully and experimenting until you find what works.
Piano
For several years of my career, I had to "suffer" through life trying to get a great sound out of a nine-foot Kawai grand piano, both for live worship services and for studio work. Sometimes life is such a struggle. 😎 Frankly, one would have to go to great lengths to get a bad sound out of that piano.
So, the task then becomes how to get the best sound out of it for the application. For example, for live sound I would close-mic the piano to give me the best signal-to-noise ratio. That’s a loose translation of the term which considers the piano sound to be the signal, and anything else – like the spill from other instruments and monitors – to be the noise. When I bring up the piano in the mix, I don’t want to bring up spill from vocal monitors, for example.
So, when I place a mic on any instrument or vocal, I’m thinking nearly as much about achieving isolation from other sounds on stage as I am about capturing a great sound from that instrument or vocal.
Remember that the volume and sound produced by the piano strings is only part of the sound that you’re trying to capture. What you are really miking is the soundboard of the piano because it is responsible for developing the volume and character of the piano’s sound.
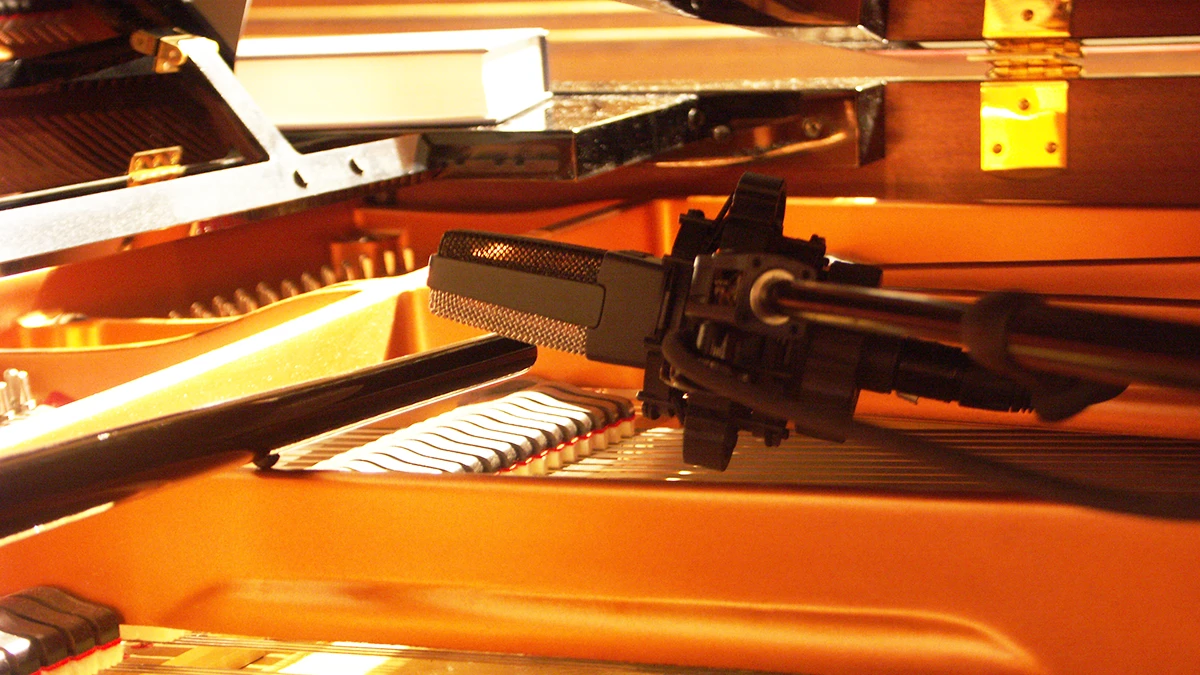
One Approach to Miking a Grand Piano
This illustration shows a mic placement for piano that I often use for live sound. If the piano is a smaller grand, a single mic can do the job. I’ll start with the mic over the middle-C strings, roughly four to five inches above the strings, and then move it around until I find the sound that works for me.
If the piano is longer than about five feet, my first approach will likely be to close-mic it using a pair of condenser cardioid mics. You might be surprised to hear how much more weight the piano sound has with that second mic. When using two mics on the piano, I consider the mic closest to the hammers to be the high end (HF) mic, and the mic placed closer to the rear tie point for the bass strings to be the low end (LF) mic.
If the budget is there, I would use a pair of DPA 4099’s, or AKG C414’s, or a pair of Neumann U87’s. Another good choice would be a pair of Shure SM81’s, AKG C460’s, C480’s or C451’s, Neumann KM84’s, or any other comparable quality condenser cardioid mic. Now don’t get me wrong. It’s fun to use high quality mics, but if what you have to work with is a pair of Shure SM57’s, that’s fine too. Find the place where they sound the best and go for it.
Several of the mics that I mentioned above provide various switches to tailor the sound to the need. In the case of close-miking the piano, I would typically set the switches to choose the cardioid pattern, no pad, and possibly a low end rolloff. The choice of using the rolloff might depend on whether or not the console has a high pass filter on each channel. Using the low end rolloff switch will clean up the sound and help you preserve the overall headroom of the system.
Another possibility is to use one or two Crown PZM mics. I know that’s “old school” now, but it can still work. The typical approach is to place them on the underside of the piano lid, since that provides a large boundary for the mic. Another choice is to place the PZM mic at the base of the stick, with the mic facing from right to left across the piano strings.
The piano lid itself is certainly part of the character of the piano sound as we are used to hearing it. If you’ve ever been to one of my workshops, you’ll know that I “harp” (so to speak) about keeping the piano lid opened up slightly. To my ears as the pianist, anytime I hear a piano with the lid closed, it just sounds boxy and muffled.
That said, I’ve heard it work. A friend at a church in Dallas uses a pair of DPA subminiature omni mics on magnetic mounts inside the piano, with the lid closed. The first time I saw that I told him that it wouldn’t work. But actually, it works great!
Now if you really need to mic the piano with the lid closed, give the Helpinstill Piano Sensor a solid try. It delivers a clean, full sound of the piano, with two powerful benefits – it won’t feedback, and it won’t pick up sounds from other instruments or stage monitors. It’s not a mic – it’s a “sensor”. I liken it to guitar pickups on the piano.
Two other approaches that I don’t care for are (1) miking the piano at one of the holes in the harp, and (2) miking the piano from underneath the soundboard. Miking the piano at one of the holes is certainly louder, but it can also present a pinched, strong midrange, honky sound. Miking the piano underneath the soundboard presents a muddy, indistinct sound and misses the harmonics of the strings as heard up by the hammers.
I’ll never forget a consulting visit that I made to a church one time that complained of a poor piano sound. They could never get the piano loud enough over the monitor spill, and it just didn’t sound good. One look at the stage told me why. They had a PZM mic sitting on a stand under the piano about one foot below the soundboard, and there was a stage monitor not four feet away aimed, for some reason, right across the underside of the piano. Trust me when I say that one can achieve a warm, full sound with great clarity by miking the piano from above the strings.
There are two useful approaches for miking an upright piano. One is to place an omnidirectional mic, or even a PZM, inside the piano near the hammers. As a last resort, you “could” mic the soundboard from the back with a cardioid mic. (You probably won’t like the sound, but …)
Now, if you're feeling adventurous and want to experiment with an advanced stereo miking technique, here's one I've enjoyed using in the recording studio or even for recording on a concert stage. It’s called the M-S (middle-side) technique.
This is a classic stereo miking technique. It uses one cardioid mic (the middle mic) facing the sound source, and one bi-directional mic (the side mic) facing perpendicular to the sound source. That aims the maximum rejection point of the bi-directional mic right at the sound source. A complex transformer matrix is often used to combine the outputs of these mics to provide a stereo output. But here’s a simpler technique.
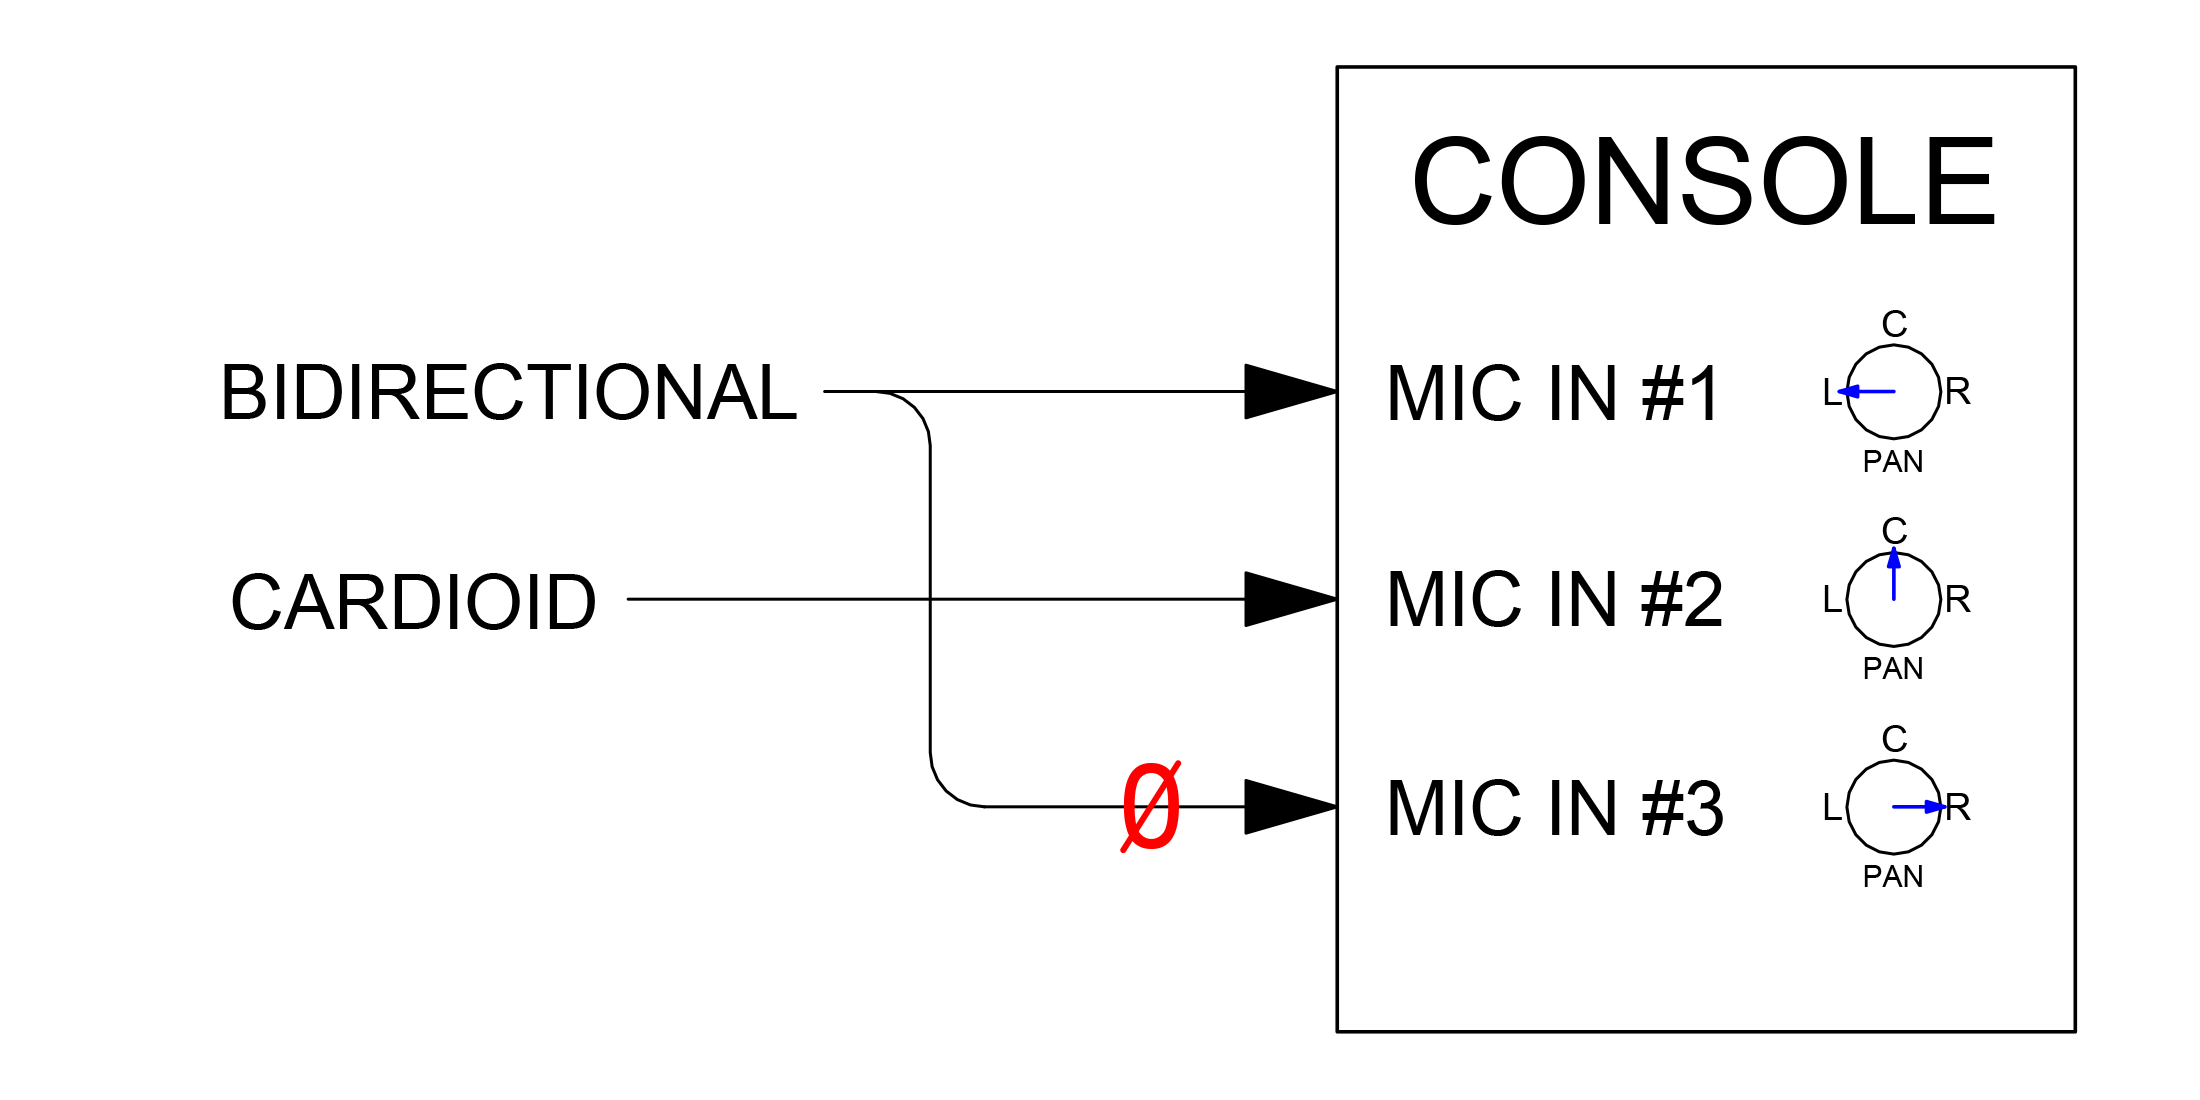
Simple Signal Flow of a Middle-Side Mic Technique
The output of the cardioid mic comes into the console on one fader. The output of the bi-directional mic is split with a Y-cord and brought into two separate channels of the console. One of the two inputs from the bi-directional mic is reversed in polarity, either by using the polarity reverse switch on the console, or by wiring one leg of the Y-cord out of polarity. Be sure that you feed phantom power to the bi-directional mic through only one of these two inputs.
The cardioid mic is panned to the center, and the two bi-directional mic inputs are panned far left and far right. (My habit is to pan the in-polarity input to the left.) The cardioid mic is responsible for the main sound pickup, and the two inputs from the bi-directional mic provide the width and ambient sound. The cool thing about this arrangement is that you can literally control the spread of the pickup by varying the amount of the bi-directional signal used. Note that the left and right bi-directional mic feeds must be matched in both level and EQ choices.
One bonus attribute to this technique is that if the signal is heard in mono, e.g., on a mono radio or TV feed, or over a mono recording, the two side signals will cancel and leave you with the middle signal intact. Try it. The depth of the sound must be heard to be appreciated. I have a recording that I did of one of my piano instructors in college. I recorded his master’s piano recital and used this M-S technique. The imaging is so incredible that if you close your eyes while listening, you can almost point to where the notes are coming from. It’s phenomenal!
Acoustic Guitar
The best recording of an acoustic guitar that I ever got was using a Sony C-48 in the cardioid pattern, with the mic placed roughly eight feet in front of the guitar and ten feet in the air, in a very large room. People who listen to it are convinced that it is miked within two feet of the guitar. What they hear is a very natural sounding guitar that still has intimacy.
Obviously, those distant miking techniques would not work well for live sound reinforcement. They offer too much potential for feedback, and if there are other instruments or vocals playing, they’ll pick up way too much spill from other sound sources. A common studio technique for miking an acoustic guitar that can also work well for live sound is shown here.
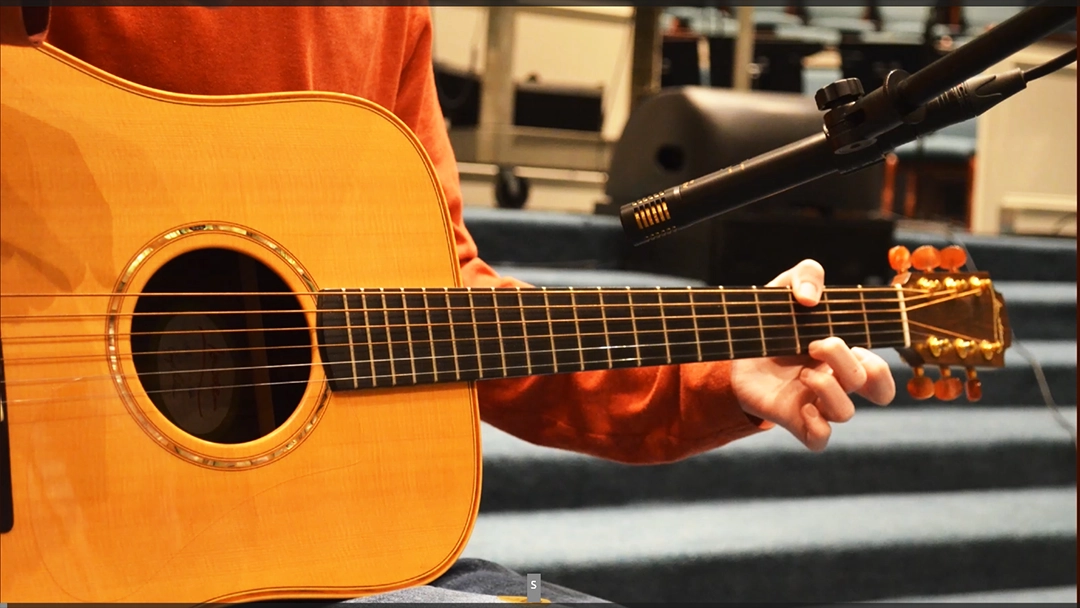
Miking an Acoustic Guitar
Miking an acoustic guitar for sound reinforcement is a task that many of us deal with every week. Not only do I typically want a natural sounding guitar in the house system, but I also need to provide plenty of gain-before-feedback to the guitarist’s stage monitor. That last part can be no small feat if the guitarist is fingerpicking softly with a loud worship band backing them up.
If the guitarist has invested in a great sounding pickup, then by all means use a direct box! You’ll get a decent guitar sound with minimal spill from the monitors and other instruments on stage and good gain-before-feedback.
For a natural sounding guitar in the house, I like using a condenser cardioid mic, often with a 75 Hz rolloff. I stay to the side of the sound hole in line with the fret board, aimed basically toward the sound hole. Yes, you can get a louder sound at the sound hole, but it also sounds terribly muddy. Since the body of the guitar is a resonant cavity, miking at the hole can also easily get you into feedback problems.
While the cardioid pattern works well in most applications, if you need a little more gain-before-feedback, and you’re still using a stage monitor on the floor in front of the player (instead of headphones or in-ear monitors), then try using a hypercardioid pattern. Adjust the angle of the mic so that it picks up the guitar yet aims the maximum rejection point of the hypercardioid pattern at the stage monitor.
Drums
Here again, we need to define what type of sound we’re going for. Is it orchestral, jazz, middle-of- the-road, rock, and so on. The sound that probably most of us work with is the MOR style, typical of many of the contemporary Christian songs.
There are so many great choices for drum mics. Try these if you haven’t already: the Sennheiser 421, EV RE20, Audix D6 or Shure BETA52A for kick, a Shure SM81 or SM57 for snare, a DPA 4099, AKG C414, or Sennheiser 421 for rack toms and floor tom, and Neumann U87, AKG C414, or Shure SM81 for overhead and/or for hi-hat. The next photo shows a typical setup for my sound reinforcement work. By the way, if your loudspeaker system is mono, or you’re not recording in stereo, do you really need two overhead mics on the drums?
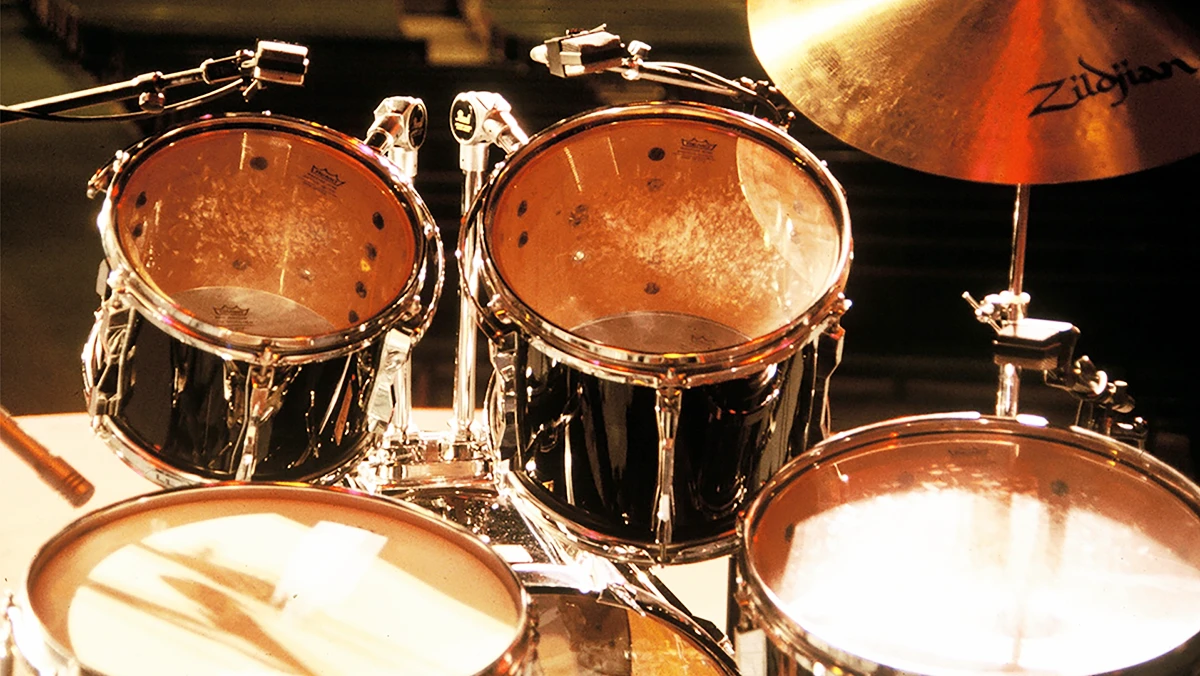
Miking an Acoustic Drum Kit
Note that to capture this MOR, rock, in-your-face kind of sound, we typically place the mics just inches away from each drum head. I usually place the mic three to six inches above the head. I’ve seen some place the mic literally one-half inch off the head. Because of that close miking technique, an MOR or rock drum sound is a very hyped sound. In other words, unless you like to listen to the drums with your ear just inches away from the drum head, it’s an unnatural sound. It’s bigger than life partly because of the proximity effect – the buildup of low frequencies at close working distances – that is inherent in the design of most cardioid mics.
Brass & Woodwinds
Let’s say you have brass instruments that are already so loud acoustically that you don’t need to reinforce them through the main loudspeaker system. But you still need to mic them for the livestream or a recording.
You can have the best of both worlds by creating a separate mix for the livestream. That way, you can bring the brass into the livestream mix and balance them with the other instruments without adding any more brass to the sound in the room.
Think about it. Does Phil Driscoll have a natural trumpet sound? No, unless you like to listen to the trumpet just inches from the bell. Kenny G. doesn’t have a natural saxophone sound either. But does it sound good? Sure. We’ve all come to accept and enjoy their playing. If you have several players that you need to mic, and you’re backing the mic off a few feet to capture a more natural sound, just remember the 3:1 Rulewhen you consider the spacing between mics.
As far as mic choices go, I often prefer a dynamic for trombones because it tends to round out the sound, making it less edgy. The Sennheiser 421 or even the RCA 77DX (if you can find one) work well. For trumpets, I’ll go with any good condenser cardioid. There’s so much acoustic energy there when the trumpet player plays hard that you’ll probably find yourself putting in a -10dB pad to keep the mic preamp from distorting. Or use a dynamic and you won’t have to worry about that.
For saxophone, remember that sound comes from all of the open holes on the instrument, including the bell and all the open keys. The same is true for other woodwinds, including clarinet, flute, etc. To get a truly natural sound you’ll need to back off a foot or two.
Also consider the placement of the mic relative to their music stand. If you put the mic just below or behind the music stand, you can get a good clean pickup of the sound while still avoiding any phase cancellations caused by the reflections off the music stand getting into the mic pickup. This illustration shows how to get a clean sound from the instrument while avoiding reflections from the music stand.
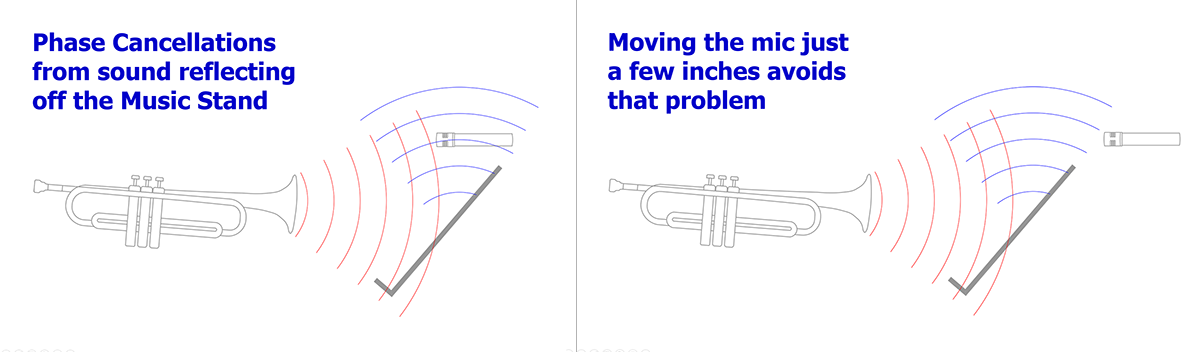
How to Avoid Phase Cancellations from a Music Stand
If it’s a solo saxophone, flute, trumpet, etc., I have no problem with them using a mic clipped to the instrument. In fact with a flute you could try an earworn mic. It works amazingly well.
They usually sound fine, the player often prefers their sound to be swimming in effects, and the approach yields great pickup, little spill from other instruments, and great gain-before-feedback. All of that works in our favor as the engineer. If you’re looking for clip-on microphones, take a look at Audix, DPA, Audio-Technica, Applied Microphone Technology, Shure and MiPro.
Don’t Blame it on the Mic, or the Engineer
Before I go, let me offer this parting thought. It’s no secret that a good engineer can apply their hard-won knowledge of mics, placement techniques, and channel EQ to capture the best possible sound from a given instrument. But that’s only part of the battle. The quality of the instrument itself plays a major factor in the quality of sound you’re going to get in the first place.
If the acoustic guitar, for example, doesn’t sound great being played without a sound system, then no amount of technique or electronics you can throw at it is going to make much of an improvement. Miking it with an $1,800 mic will faithfully capture just how bad the instrument sounds.
On top of that, the skill of the musician also plays a huge factor. Some players can get a great sound out of mediocre sounding instruments.
All that to say, if your piano, or your acoustic guitar, or whatever, doesn’t sound world-class to your ears, don’t place all of the blame on the mics you have to use, or the sound technician who is placing them. We’re all in this together, equally responsible for the results, and none of us should be made the scapegoat for poor sound.
That brings us right back to where we started. Great mic technique isn’t just knowing which microphone to buy or where somebody else placed it. It’s learning how the instrument creates sound, paying attention to everything else happening on the platform, and listening for the sound you want to capture. The EQ can help you finish the job. But don’t forget what you can accomplish before you ever touch it.
The best thing to do with any of this is to experiment. The more you experiment, especially in a controlled listening environment, the more you’ll learn about mic technique. Just put the mic where it sounds good, then trust your ears, and you can’t go wrong.
Be Blessed!
See you next time.